Version Control
Version control systems (or VCS) are software tools that are used to track changes to source code or other collections of files.
Wikipedia has a fairly long list of version control systems, each of them varying in practical usage and in implementation details. These days Git is the most popular version control system in use. Git appears to have “won”, and so Git is what we will be discussing here.
Why do we need version control?
When you work on a project, you often will want to save the state of your code at various points, such that you can go back and forth between these various points. When you work on a project as part of a team, you will also want to know who wrote some part of the code, when, and why.
Whether you work alone or in a team, using a version control system will help you achieve the above goals. Sometimes your team member is the past you (who should help you), or the future you (whom you should help).
In the absence of a version control system, you will often will end up with a chaotic mess which achieves the above goals in a poorer manner. You will likely resort to several almost-same-but-not-quite files variously named like so:
notebook.ipynbnotebook-2024-05-01.ipynbnotebook-2024-05-01-final.ipynbnotebook-working.ipynbnotebook-test.ipynbnotebook-final.ipynb
(Or think of the situation depicted by this PHD Comics strip.)
This scheme is basically a messy reinvention of a version control system. That might work in the simple cases, but it will soon break down as you do more work on your project.
You want to avoid the cognitive overload of dealing with messy schemes based on file names. You want to use a version control system properly.
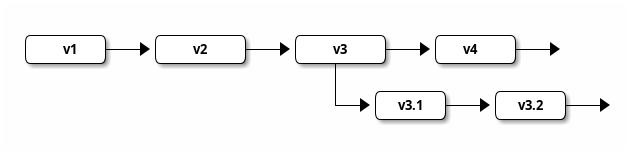
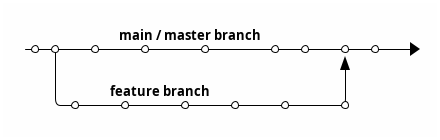
Conceptually, you can think of the evolution of versions over time as a directed graph:

Sometimes you branch out, say, when exploring a new direction:
And you might eventually want to merge the branch to the “main” body of your graph:
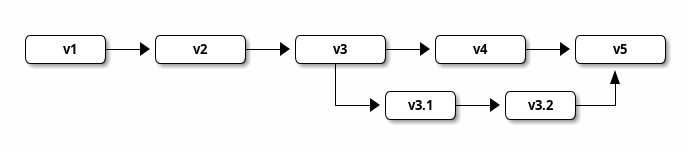
With a version control system, you can to do these things in a less ad-hoc manner.
Version control in practice: Git
Git is a command-line program that runs on all popular operating systems. If you use macOS or Linux, you probably have Git installed already. Here we assume that you are using the account that you have with CLASSE.
Let us prime ourselves for Git with an XKCD strip:
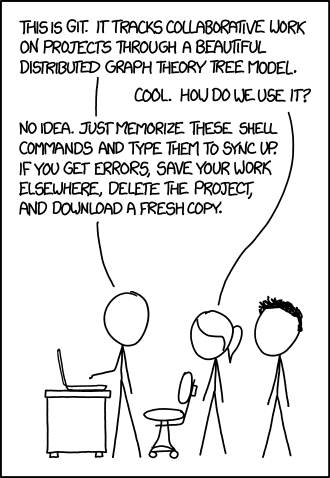
As the cartoon suggests, Git has a (perhaps well-deserved) reputation for being rather unfriendly or inscrutable. With some familiarity and practice, it can be tamed.
Depending on your background, you might find that learning Git by first understanding the data model more helpful. Version control module of the MIT course “The Missing Semester of Your CS Education” and Git from the Bottom Up by John Wiegley take this route. These notes that you are currently reading, however, take the more traditional path of introducing you to the more frequently used Git commands.
First steps with Git
You can start trying out git by running the below in a terminal:
$ git helpThis should print some common Git commands used in various situations.
The specific output from git help might vary depending on the version of Git that you are using. You can find the version of Git that you’re using by running git version.
You might find git help -g (or git help --guides) useful:
$ git help -g
The common Git guides are:

   attributes   Defining attributes per path
   glossary     A Git glossary
   ignore       Specifies intentionally untracked files to ignore
   modules      Defining submodule properties
   revisions    Specifying revisions and ranges for Git
   tutorial     A tutorial introduction to Git (for version 1.5.1 or newer)
   workflows    An overview of recommended workflows with Git

'git help -a' and 'git help -g' lists available subcommands and some
concept guides. See 'git help <command>' or 'git help <concept>'
to read about a specific subcommand or concept.
Getting started with Git
Git commands are generally of the form git <subcommand>, where <subcommand> is for the specific operation you want to do. We will discuss them in the following sections.
There is also a little bit of configuration that you should do, before you are able to git add and git commit your changes. Let us start with this configuration.
Initial configuration
Git keeps track of who makes changes. For this to work, you’ll need to configure Git using git config subcommand:
$ git config --global user.name "Your Name"
$ git config --global user.email "you@example.com"
This will write configuration to a file named .gitconfig in your home directory.
$ cat ~/.gitconfig
[user]
    name = Your Name
    email = you@example.com
Of course, you should use “real” values instead of Your Name and you@example.com.
Starting a new repository
Let us start with a very simple example, just for practice. We will create a brand new Git repository, and commit some changes to it.
Now, what is a repository, and what are commits?
A Git repository is essentially a directory where Git tracks your files and manages changes to them. It is a database that stores your project’s history. This history includes every version of every file in your project, and who made those changes, and when, among other things.
A Git commit is a snapshot of your project at some point in time. You can think of them as versions.
On lnx201, let us create a new directory (with mkdir hello-world), change to that directory (with cd hello-world), create a file in that repository, and initialize a git repository there (with git init):
$ mkdir hello-world
$ cd hello-world/
$ echo "hello $USER"
hello ssasidharan
$ echo "hello $USER" > hello.txt
$ cat hello.txt
hello ssasidharan
$ git init
Initialized empty Git repository in /home/ssasidharan/hello-world/.git/
That created an empty repository, meaning, nothing has been added to it. As you can see, git init created a directory named .git/ inside hello-world/. This .git directory is the repository’s “database” – this is where Git stores information about your project, including version history, configuration settings, and references to commits, and more.
The "." prefix in .git/ means that it is a “hidden” directory. It won’t appear in the output of commands such as ls. You will need to use ls --all or ls -a.
Running git status will show an “untracked file”:
$ git status
# On branch master
#
# Initial commit
#
# Untracked files:
#   (use "git add <file>..." to include in what will be committed)
#
#   hello.txt
nothing added to commit but untracked files present (use "git add" to track)What does On branch master mean?
Think of a branch as a line of development. Your work almost always happen on a branch. When you start a project, Git uses a default branch called a master. With newer versions of Git (since , the default branch is called main.
An “untracked file” means Git do not know about the file. We will need to add that file to Git.
Adding changes
Let us add hello.txt to the repository, and check the status again:
$ git add hello.txt
$ git status
# On branch master
#
# Initial commit
#
# Changes to be committed:
#   (use "git rm --cached <file>..." to unstage)
#
#   new file:   hello.txt
#
The command git add hello.txt adds the file hello.txt to the repository. You could also have done a git add . to add all files in the directory to the repository.
Note that git add hello.txt does not commit hello.txt to the repository; it just tells Git to pay attention to the file. With git status, we can see that Git is aware of the fact that there are some changes to be committed in the repository.
Committing changes
Use git commit to actually commit the tracked file to the repository:
$ git commit -m "Add hello.txt"
[master (root-commit) 708bfca] Add hello.txt
 1 file changed, 1 insertion(+)
 create mode 100644 hello.txt
The string following -m option (-m is short for --message) is a commit message. You use commit messages to describe the change in a single short line.
Note that commit messages are not required to be single lines. On lnx201, if you run git commit without -m <message>, an editor will be launched where you can write a more detailed commit message. You can configure a different editor for writing commit messages, if you want to do so. As a general rule, your commit message should start with a short description of the commit in a single line, followed by a blank line, followed by a more detailed description of the commit.
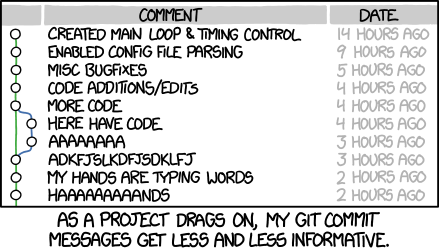
Over time, your commit messages will tell the story about how your project evolved. More details in commit messages would be quite useful when you or someone else revisit the change at some point in the future.
Now we can use git status to re-check status of the repository:
$ git status
# On branch master
nothing to commit, working directory clean
We can use git log to view the commit history:
$ git log
commit 708bfcafe32528e90e1d52fd6b94f0c44476518a
Author: Sajith Sasidharan <ssasidharan@lnx201.classe.cornell.edu>
Date:   Tue Apr 23 19:10:02 2024 -0400

    Add hello.txt
The commit 708bfcafe32528e90e1d52fd6b94f0c44476518a part is what is known as a “commmit hash” or a “commit ID”. It is a 40-character hexadecimal string generated using a cryptographic hashing algorithm. Each commits get a unique commit hash, and represents the state of the repository at a given point of time.
Let us add some more changes, and commit them:
$ echo "hello from $HOSTNAME" >> hello.txt
$ git status
# On branch master
# Changes not staged for commit:
#   (use "git add <file>..." to update what will be committed)
#   (use "git checkout -- <file>..." to discard changes in working directory)
#
#   modified:   hello.txt
#
no changes added to commit (use "git add" and/or "git commit -a")
$ git add hello.txt
$ git commit -m "Update hello.txt"
[master 233c748] Update hello.txt
 1 file changed, 1 insertion(+)
$ git status
# On branch master
nothing to commit, working directory clean
Try git log to show commit history again:
$ git log
commit 233c748ad3dd31c11a3bc12d0cf106d7fe888fc3
Author: Sajith Sasidharan <ssasidharan@lnx201.classe.cornell.edu>
Date:   Tue Apr 23 19:22:29 2024 -0400

    Update hello.txt

commit 708bfcafe32528e90e1d52fd6b94f0c44476518a
Author: Sajith Sasidharan <ssasidharan@lnx201.classe.cornell.edu>
Date:   Tue Apr 23 19:10:02 2024 -0400

    Add hello.txt
Some more terminology
Files that are tracked by Git can be in one of these stages:
- Modified: you have changed the file, but has not added or committed it.
- Staged: you have done a
git addon the file, thus moving into the “staging area” of the repository. - Committed: you have done a
git commit, thus storing the file in your local Git database.
Let us see what this means with a diagram:
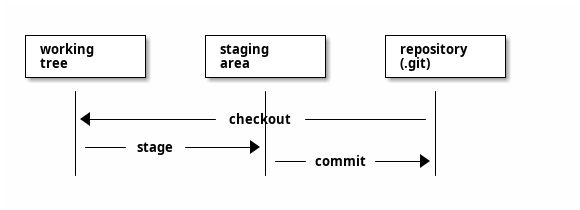
The working tree is what you get when you initialize repository (with git init) or check out a repository (with git clone). The files you work with are here. When you modify a file, you will need to move it to the staging area before committing it.
The staging area stores information about what will go into your next commit. In Git terminology, staging area is also called the index.
When you do git commit, your staged changes will be committed to the database in .git directory. With these two-step actions, you get more control over what set of changes you get to commit to the project.
With git commit -a (or git commit --all), you can stage the changes and commit them at once:
$ echo "third line" >> hello.txt
$ git commit -am "Add a third line"
Note that git commit -am "Add a third line" is the same as git commit --all --message "Add a third line".
Reviewing changes
We have git status and git log in action already. Another command is git diff, which is used to find the difference between two commits:
$ git diff 708bfcafe32528e90e1d52fd6b94f0c44476518a 233c748ad3dd31c11a3bc12d0cf106d7fe888fc3
diff --git a/hello.txt b/hello.txt
index c5d1025..3f4c47c 100644
--- a/hello.txt
+++ b/hello.txt
@@ -1 +1,2 @@
 hello ssasidharan
+hello from lnx201.classe.cornell.edu
A useful shortcut is git diff HEAD~:
$ git diff HEAD~
diff --git a/hello.txt b/hello.txt
index c5d1025..3f4c47c 100644
--- a/hello.txt
+++ b/hello.txt
@@ -1 +1,2 @@
 hello ssasidharan
+hello from lnx201.classe.cornell.edu
In Git parlance, HEAD implies the last commit on the current branch, and HEAD~ is the commit before that, and git diff HEAD~ would print the difference between the latest commit and the one before that.
Eventually, once there are more commits in the repository, you can view the difference with an arbitrary number of commits in history with git diff HEAD~~~ (or, more conveniently: git diff HEAD~3), and so on. You get the idea.
Another shortcut for those really long commit hashes is using a smaller prefix of them. You can find these “short hashes” with git log --abbrev-commit or git log --oneline:
$ git log --oneline
233c748 Update hello.txt
708bfca Add hello.txt
$ git diff 708bfca 233c748
diff --git a/hello.txt b/hello.txt
index c5d1025..3f4c47c 100644
--- a/hello.txt
+++ b/hello.txt
@@ -1 +1,2 @@
 hello ssasidharan
+hello from lnx201.classe.cornell.edu
Removing files
To remove files from your project, use git rm <path> followed by git commit:
$ git rm hello.txt
$ git commit -m "Remove hello.txt"
Undoing changes
You have made some changes, but you don’t actually want to keep those changes. You do not want to add them or commit them. To discard all such changes in your working directory, use git reset:
$ git reset --hard HEADIf you want to keep the changes but continue working on them without committing yet, you probably want to do:
$ git reset --soft HEADOften you can do a git reset <commit> to restore the state of your working tree to what is reflected by <commit>.
At any point, you can use git reflog (or “reference log”) to find where you were previously:
$  git reflog
ddec657 HEAD@{0}: commit: Remove hello.txt
d73c5c8 HEAD@{1}: commit: Add a third line
233c748 HEAD@{2}: commit: Update hello.txt
708bfca HEAD@{3}: commit (initial): Add hello.txt
This output is useful when you want to set the state of your working tree using git reset or git checkout.
Once you have made a commit, you can undo that with git revert, which will create a new commit which will revert undesired changes:
$ git revert <commit>Ignoring (some) files
Some files just should not be under version control. Examples would be:
- Anything generated by a build process, or a compiler, or a test suite, or some such. You do not want to commit the byte-compiled
.pycfiles, for example. - Secrets, or files containing secrets (such as passwords, or tokens).
- Editor configuration files.
You should tell Git to ignore these files by adding their names to a .gitignore file, with one name on a line, so that git status will ignore them. You can use wildcard patterns such as *.pyc.
On lnx201, you probably should ignore the .directoryhash files automatically created by the file system; when you use macOS, you want to ignore .DS_Store files. So your .gitignore should have:
.directoryhash
.DS_Store
Take a look at X-CITE course’s .gitignore for another example.
Working with branches
A branch is a line of development. The default branch for Git is master (or main, for newer versions of Git). If you are working on a small project by yourself, you probably can commit your changes on the default branch.
However, when working on bigger projects or working with others, you will want to use branches. This will ensure that there is less “churn” in the default branch, and keep things manageable.
You will create a branch when you implement a feature, for example, and when you are done implementing the feature, you will merge that branch to the default branch.
Nothing stops you from branching off from your non-main branches and merging back to the branch either. Branching and merging are (usually!) quick and easy with Git. (Well, except when there are merge conflicts. This happens when the changes on your branches diverge from the changes on the branch that you are trying to merge to.)
To find the branch on which you currently are, use:
$ git branchTo create a new branch named feature-branch, use:
$ git branch feature-branchTo switch to the newly created feature-branch, do:
$ git checkout feature-branchYou can also create a branch and check it out in a single command:
$ git checkout -b feature-branchMerging branches
When you are ready to merge feature-branch to main branch, you will do:
$ git checkout main
$ git merge feature-branch
If the merge is not successful, you will encounter an error message:
$ git merge feature-branch
Auto-merging test.txt
CONFLICT (content): Merge conflict in test.txt
Automatic merge failed; fix conflicts and then commit the result.
Now git status would indicate that you have a situation:
$ git status
# On branch master
# You have unmerged paths.
#   (fix conflicts and run "git commit")
#
# Unmerged paths:
#   (use "git add <file>..." to mark resolution)
#
#   both modified:      test.txt
#
no changes added to commit (use "git add" and/or "git commit -a")
Git would have added some conflict markers (<<<<<<< and ======= and >>>>>>>) to indicate the places where it had trouble merging.
test.txt
<<<<<<< HEAD
line 1
line 2
=======
line 3
>>>>>>> feature-branch
This is when you open a text editor, find the conflicts, and resolve them manually. It is up to you to accept what you want and reject what you do not. You should do that, and remove the conflict markers. You will probably end up with:
test.txt
line 1
line 2
line 3
Now you can commit this with:
$ git commit -am "Resolve conflict"In more complicated situations, you will probably have to use a merge tool. See git-mergetool for details.
Working with remote repositories
This far, we’ve talked about how you work in a local repository.
You will want to be able to share your work with others, and be able to check out the projects others have created. This is typically done with hosting your repository somewhere in a server. These are called remote repositories.

You will git clone remote repositories, and you will git fetch or git pull updates them from, and you will git push your changes to them. In practice, you will very likely use an account on a code hosting site such as GitHub, and push your code to a repository there.
While working with a central remote repository is the most usual Git workflow, it is worth noting that Git enables other kinds of workflows also. See the chapter Distributed Git - Distributed Workflows from Pro Git for some examples.
These very notes that you are currently reading are version controlled using Git, and they are hosted at the GitHub repository at https://github.com/RENCI-NRIG/X-CITE/. You can get a local copy of that repository using git clone command:
$ git clone https://github.com/RENCI-NRIG/X-CITE.git
Cloning into 'X-CITE'...
remote: Enumerating objects: 948, done.
remote: Counting objects: 100% (485/485), done.
remote: Compressing objects: 100% (266/266), done.
remote: Total 948 (delta 228), reused 421 (delta 172), pack-reused 463
Receiving objects: 100% (948/948), 4.52 MiB | 0 bytes/s, done.
Resolving deltas: 100% (446/446), done.
You can cd into that directory now with cd X-CITE, and then run some git commands such as git status and git log there:
$ cd X-CITE/
$ git status
# On branch main
nothing to commit, working directory clean
$ git log
commit fd95497e30827d52dd99855a0e1be99b3db4282e
Author: Sajith Sasidharan <sajith@hcoop.net>
Date:   Mon Apr 22 09:27:27 2024 -0500

    Mention the trace module

commit 7d55b104b50f8b1f5b8201765ceac8541f9543df
Author: Sajith Sasidharan <sajith@hcoop.net>
Date:   Mon Apr 22 09:16:44 2024 -0500

    Add a line

[... more output, elided for brevity ...]
Getting updates from a remote repository
After you originally cloned a remote repository, other people might have pushed new commits or branches or tags there. Using git fetch command will retrieve those updates, but without committing them to your local repository.
$ git fetch originHere origin refers to the remote repository. You can list remote repository with git remote, and git remote -v will print some more details about them.
You can then do git diff origin/main to view the changes, and do git merge origin/main (or git rebase origin/main) to get those changes in your local copy.
When you want to fetch updates from the remote repository and automatically merge them into your current branch in one step, you will do a git pull:
$ git pullHere you are fetching and merging changes from the main branch in the remote repository to your current local branch.
Getting updates to a remote repository
The inverse of a git pull is git push. You use a git push to get your changes to a remote repository:
$ git push origin mainIf you are trying to push to X-CITE repository, this will ask for your username and password, and even if they are correct, git push will most likely fail, because you do not have the necessary permissions to write to the remote repository.
If you want to add your changes to X-CITE repository on GitHub, you will want to fork the repository, make your changes in your fork of the repository, and send a pull request to X-CITE repository. This is a somewhat separate discussion. Start with GitHub’s documentation to learn more.
Software forges
A software “forge” is a hosting service that can host your Git repositories, and provide many additional services (such as bug tracking, code reviews, continuous integration, etc) that helps you collaborate with other people.
- GitHub.com happens to be the most popular one.
- Gitlab.com
- Many organizations and projects choose to self-host a version of GitLab. See CLASSE GitLab, for example.
- Codeberg.org, which runs Forgejo software.
- SourceHut.org
- BitBucket.com
Some organizations and people prefer to self-host a forge, and some people prefer no forge at all. Since Git is a distributed version control system, you should be able to collaborate with no forge at all: you can share your changes as email attachments, if you want. Git was originally developed for Linux kernel development, which uses no forge at all.
Exercises
Create an account on GitHub.com (or another forge of your choice), if you do not have an account there already. Create a new repository on the forge of your choice. Push some code that you are working on to that repository.
Make some more changes to your project, and commit them. Push those commits also to the Git repository.
Create a Git tag (based on today’s date, or a version number), and push the tag to your repository.
If you want to add a new feature to your project, create a branch, and make your changes on the branch. When you are done, merge the feature branch to your
mainormasterbranch.If you find errors in these notes, or want to suggest improvements, report them by creating an issue on https://github.com/RENCI-NRIG/X-CITE/.
If you want to propose some changes to these notes (such a fixing a mistake or improving these notes), create a pull request against https://github.com/RENCI-NRIG/X-CITE/.
References
- Pro Git
- Git cheat sheet
- Version Control module of The Missing Semester of Your CS Education.
- About Git section of GitHub documentation.